How create grass text effect in Illustrator
- June 19th, 2023
- Illustrator
In this tutorial, I will show you how to create a stunning grass text effect in Adobe Illustrator. This lesson is designed for beginners, so you don’t need to worry about anything being too difficult. With this tutorial, you will learn not only how to create the grass text effect, but also how to use various tools and features in Illustrator to enhance your design skills.
Premium design assets for
your next project
Acess to a huge libary of design resources from Photoshop brushes to vector resources.
Join todayPreview

Step 1: Text
Open Illustrator and create a new document of any size you want (I used 800x800px). Select the text tool and and type your text (I used Myriad Pro Bold).

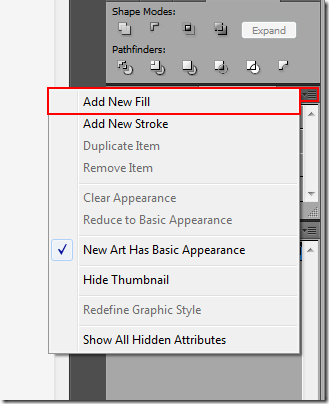
Now make a gradient for the text, for that go in Window and activate Appearance or press Shift + F6. After that click on the small arrow in the right corner and select “Add New Fill”.
Now we can use gradient for the text. I used linear gradient from #98c739 to #699c35 .

Now with pen tool draw some grass growing from the text and fill it with the same gradient that we used for the text.

Step 2: Leaves
Make a new layer and name it “leaves”.
With pen tool draw a path as you see in the image and fill with the same gradient that we used for the text.

Now draw the second part of the leaf and fill with gradient.

Now connect the leaf to your text.

For the highlight draw a similar path with pen tool, and apply a white gradient of three sliders. The first and the last one with the 0% opacity and the middle one with 50% opacity.


For water drops I used Ellipse Tool (L) and a Radial gradient (white to transparent).

For reflection of water I used white brush with 50% opacity.

After that select all the components of water drop and press Ctrl + G to group them, make a copy of this group and reduce the size.

Now make a copy of layer “leaves”. After that go to Object > Transform > Reflect… Choose Axis: Vertical and press Ok. Scale donw the copy.

For better effect make some more copies of the leaf and water drops and scatter on the text.

Step 3: Lady bird
Now we’ll define a pattern for our lady bird. Draw a square (fill with #C1272D) and a circle inside it in that way so their centers match.

Now draw four quarters in the corners, for that draw a 4 circles in the corners.

Select all the shapes and in pathfinder click “Divide” after that remove excess (click on the circles and press delete).

Select all newly created shapes and go Edit > Define Pattern, give it a name and press ok.
Now make a circle on the leaves for the body of lady bird and fill it with the pattern that we made (select the circle and in Window > swatches select the Pattern).

For the highlights make a copy of this circle (Edit > Copy; Edit Paste in Front) and fill with linear gradient: White to transparent.

For the head make a black circle with the Ellipse tool and put it under the body, and with the pen tool make the legs.

Step 4: Final Adjustments
Draw the shadows with your pen tool and fill them with #83BC39 .

Make a copy of the text layer (name it reflection) and go to Object > Transform > Reflect… Choose Vertical Axis and press ok and put this copy at the bottom of the text.

Select the “reflection” layer and Activate Window > Transparency and make double click here:

After that you’ll get a black rectangle and your reflection will disappear.
Now with Rectangle Tool make a shape and fill with gradient Black to transparent.

And now with a radial gradient make the background.

Our text looks fresh and clean.

